

Introduction
In this tutorial, you'll learn how to create a mobile 3D game using C# and Unity. The objective of the game is to score as many points as possible. You'll learn the following aspects of Unity game development:- Setting up a 3D project in Unity
- Implementing tap controls
- Integrating physics
- Creating Prefabs
1. Create a New Unity Project
Open Unity and select New Project from the File menu to open the new project dialog. Tell Unity where you want to save the project and set the Set up defaults for: menu to 3D.
2. Build Settings
In the next step, you're presented with Unity's user interface. Set the project up for mobile development by choosing Build Settings from the File menu and select your preferred platform. I've chosen Android for this tutorial.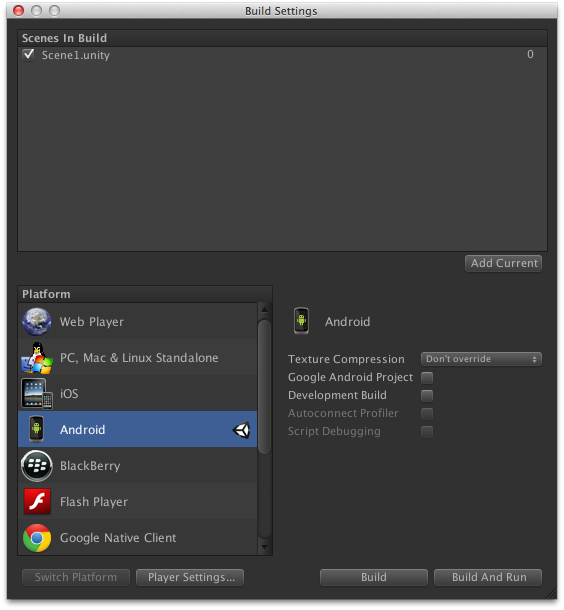
3. Devices
The first thing we need to do after selecting the platform we're targeting is choosing the size of artwork that we'll use in the game. I've listed the most important devices for each platform below and included the device's screen resolution and pixel density.iOS
- iPad: 1024px x 768px
- iPad Retina: 2048px x 1536px
- 3.5" iPhone/iPod Touch: 320px x 480px
- 3.5" iPhone/iPod Retina: 960px x 640px
- 4" iPhone/iPod Touch: 1136px x 640px
Android
Because Android is an open platform, there are many different devices, screen resolutions, and pixel densities. A few of the more common ones are listed below.- Asus Nexus 7 Tablet: 800px x 1280px, 216ppi
- Motorola Droid X: 854px x 480px, 228ppi
- Samsung Galaxy S3: 720px x 1280px, 306ppi
Windows Phone
- Nokia Lumia 520: 400px x 800px, 233ppi
- Nokia Lumia 1520: 1080px x 1920px, 367ppi
BlackBerry
- Blackberry Z10: 720px x 1280px, 355ppi
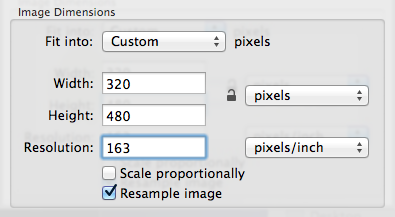
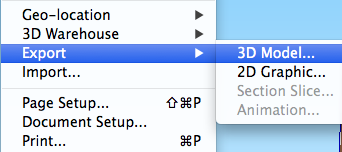
4. Export Graphics
5. Unity User Interface
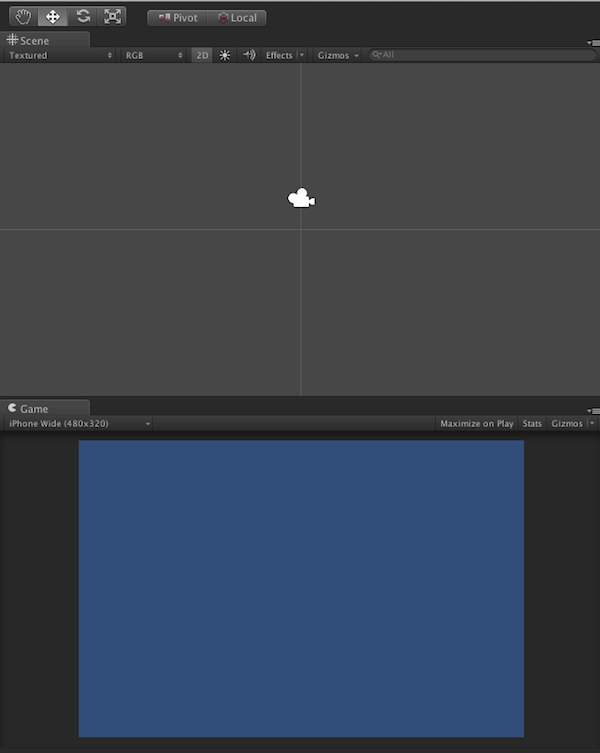
6. Game Interface
7. Programming Language
You can use one of three programming languages when using Unity, C#, UnityScript, a variation of JavaScript, and Boo. Each programming language has its pros and cons, and it's up to you to decide which one you prefer. My personal preference goes to the C# programming language so that's the language I'll be using in this tutorial.If you decide to use another programming language, then make sure to take a look at Unity's Script Reference for examples.
8. Sound Effects
I'll use a number of sounds to improve the audial experience of the game. The sound effects used in this tutorial were obtained from as3sfxr and Soungle.9. 3D Models
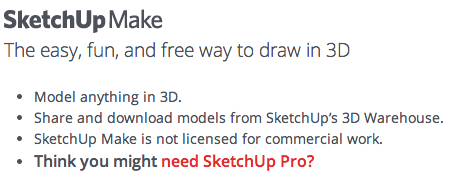
To create our game, we first need to get our 3D models. I recommend 3Docean for high quality models, textures, and more, but if you're testing or still learning then free models may be a good place to start.The models in this tutorial were downloaded from SketchUp 3D Warehouse where you can find a good variety of models of all kinds.
Because Unity doesn't recognize the SketchUp file format, we need to convert SketchUp files to a file format Unity can import. Start by downloading the free version of SketchUp, SketchUp Make.
10. Import Assets

- Select Import New Asset from the Assets menu.
- Add the items to the assets folder of your project.
- Drag and drop the assets in the project window.
11. Create Scene
We're ready to create the scene of our game by dragging objects to the Hierarchy or Scene panel.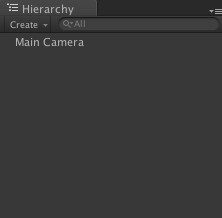
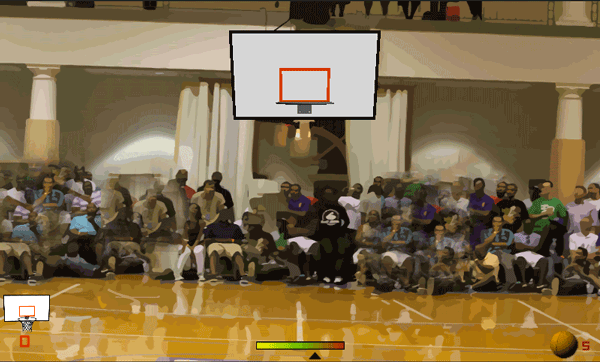
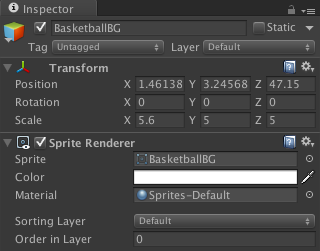
12. 2D Background
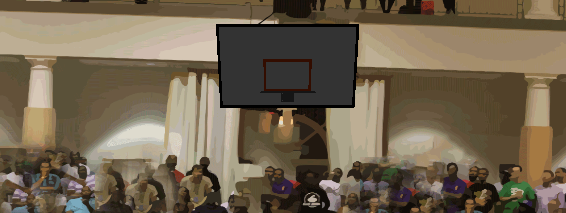
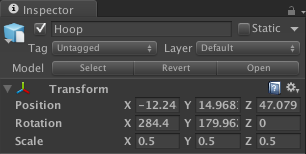
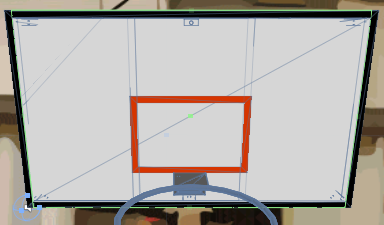
13. Hoop
14. Light
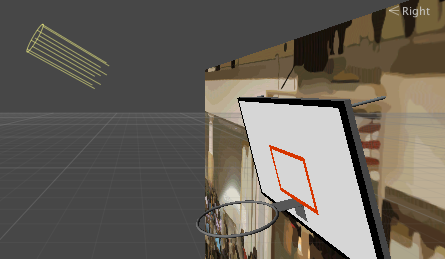
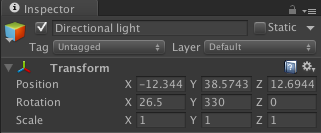
15. Hoop Collider
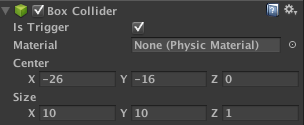
With the basketball hoop properly lighted, its time to add a collider so the ball doesn't go through when it hits the white area.Click the Add Component button in the Inspector panel, select Physics > Box Collider, and change its values as shown in the next screenshot.
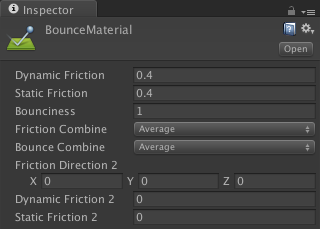
16. Bounce Physics Material
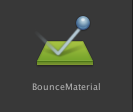
If we were throw a ball at the basketball hoop, it would be stopped by the box collider, but it would stop without bouncing like you'd expect it to in the real world. To remedy this we need a Physics Material.After selecting Create > Physics Material from the Assets menu, you should see it appear in the Assets panel. I changed the name to BounceMaterial.
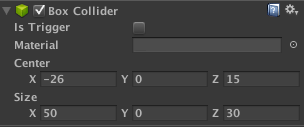
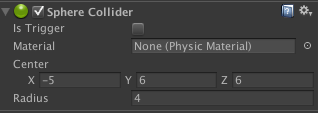
17. Basket Collider
We'll use another collider to detect when the ball passes through the hoop. This should be a trigger collider to make sure it detects the collision without interacting with the physics body.Create a new collider for the hoop as shown in step 15 and update its values as shown in the next screenshot.

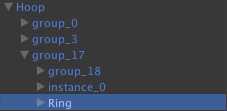
18. Ring Mesh Collider
Time to add a collider to the ring itself. Because we need the ball to pass through the center of the ring, we can't have a sphere or box collider, instead we'll use a Mesh Collider.A Mesh Collider allows us to use the shape of the 3D object as a collider. As the documentation states the Mesh Collider builds its collision representation from the mesh attached to the GameObject.
Select the hoop from the Hierarchy panel, click on the triangle on its left to expand its hierarchy, expand group_17, and select the element named Ring.
19. Hoop Sound
To play a sound when the ball hits the hoop, we first need to attach it. Select it from the Hierarchy or Scene view, click the Add Component button in the Inspector panel, and select Audio Source in the Audio section.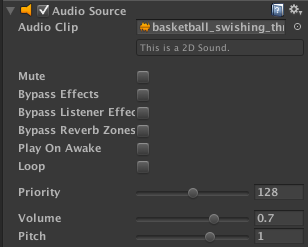
20. Ball
Let's now focus on the basketball. Drag it from the Assets folder and place it in the scene. Don't worry about the ball's position for now, because we'll convert it to a Prefab later.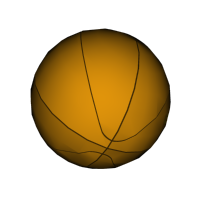
21. Ball RigidBody
To detect a collision with the basketball, at least one of the colliding objects needs to have a RigidBody component attached to it. To add one to the ball, select Add Component in the Inspector panel, and choose Physics > RigidBody.
22. Hoop Sprite
To represent the baskets already made by the player, we use a 2D version of the basketball hoop. Drag it from the Assets panel and place it on the scene as shown below.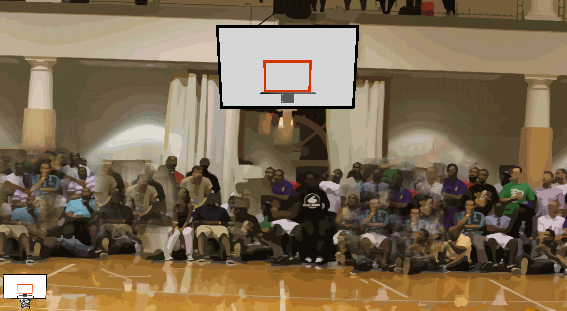
23. Score Text
Below the 2D hoop, we display the number of baskets the player has scored so far. Select GameObject > Create Other > GUI Text to create a text object, place it at the bottom of the basketball hoop, and change the text in the Hierarchy panel to 0.
24. Force Meter
The force meter is a bar that will show the force used to shoot the ball. This will add another level of difficulty to the game. Drag the sprites for the force meter from the Assets panel to the Scene and position them as shown in the screenshot below.
25. Ball Sprite
We also add an indicator to the interface showing how many shots the player has left. To complete this step, follow the same steps we used to display the player's current score.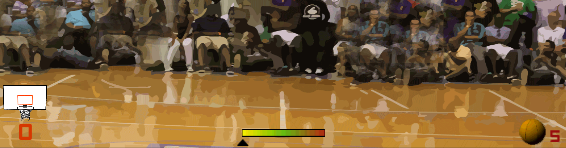
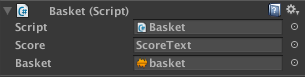
26. Basket Script
It's finally time to write some code. The first script that we'll create is theBasket script that checks if the ball passes through the ring or hits the board.Select the hoop and click the Add Component button in the Inspector panel. Select New Script and name it
Basket. Don't forget to change the language to C#. Open the newly created file and add the following code snippet.
01
02
03
04
05
06
07
08
09
10
11
12
13
14
15
16
17
18
19
20
| using UnityEngine;using System.Collections;public class Basket : MonoBehaviour{ public GameObject score; //reference to the ScoreText gameobject, set in editor public AudioClip basket; //reference to the basket sound void OnCollisionEnter() //if ball hits board { audio.Play(); //plays the hit board sound } void OnTriggerEnter() //if ball hits basket collider { int currentScore = int.Parse(score.GetComponent().text) + 1; //add 1 to the score score.GetComponent().text = currentScore.ToString(); AudioSource.PlayClipAtPoint(basket, transform.position); //play basket sound }} |
Parse method will convert the text from the GUI Text game object to a number so we can increment the score and then set it again as text using toString. At the end, we play the basket sound.27. Shoot Script
TheShoot class handles the rest of the game interaction. We'll break the script's contents down to make it easier to digest.Start by selecting the Camera and click the Add Component button in the Inspector panel. Select New Script and name it
Shoot.28. Variables
In the next code snippet, I've listed the variables that we'll use. Read the comments in the code snippet for clarification.
01
02
03
04
05
06
07
08
09
10
11
12
13
14
15
16
17
18
19
20
| using UnityEngine;using System.Collections;public class Shoot : MonoBehaviour{ public GameObject ball; //reference to the ball prefab, set in editor private Vector3 throwSpeed = new Vector3(0, 26, 40); //This value is a sure basket, we'll modify this using the forcemeter public Vector3 ballPos; //starting ball position private bool thrown = false; //if ball has been thrown, prevents 2 or more balls private GameObject ballClone; //we don't use the original prefab public GameObject availableShotsGO; //ScoreText game object reference private int availableShots = 5; public GameObject meter; //references to the force meter public GameObject arrow; private float arrowSpeed = 0.3f; //Difficulty, higher value = faster arrow movement private bool right = true; //used to revers arrow movement public GameObject gameOver; //game over text |
29. Increase Gravity
Next, we create theStart method in which we set the gravity force to -20 to make the ball drop faster.
1
2
3
4
5
| void Start(){ /* Increase Gravity */ Physics.gravity = new Vector3(0, -20, 0);} |
30. Force Meter Behavior
To handle interactions with the physics engine, we implement theFixedUpdate method. The difference between this method and the regular Update method is that FixedUpdate runs
based on physics steps instead of every frame, which might cause
problems if the device is slow due to a shortage of memory, for example.In the
FixedUpdate method, we move the arrow of the force meter using the right variable to detect when to reverse the arrow's movement.
01
02
03
04
05
06
07
08
09
10
11
12
13
14
15
16
17
18
19
20
| void FixedUpdate(){ /* Move Meter Arrow */ if (arrow.transform.position.x < 4.7f && right) { arrow.transform.position += new Vector3(arrowSpeed, 0, 0); } if (arrow.transform.position.x >= 4.7f) { right = false; } if (right == false) { arrow.transform.position -= new Vector3(arrowSpeed, 0, 0); } if ( arrow.transform.position.x <= -4.7f) { right = true; } |
31. Shoot Ball
The basketball is thrown when the player taps the screen. Whenever the screen is tapped, we first check if there's already a ball in the air and if the player has shots available. If these requirements are met, we update the values, create a new instance of the ball, and throw it using theaddForce method.
01
02
03
04
05
06
07
08
09
10
11
12
13
14
15
| /* Shoot ball on Tap */ if (Input.GetButton("Fire1") && !thrown && availableShots > 0) { thrown = true; availableShots--; availableShotsGO.GetComponent().text = availableShots.ToString(); ballClone = Instantiate(ball, ballPos, transform.rotation) as GameObject; throwSpeed.y = throwSpeed.y + arrow.transform.position.x; throwSpeed.z = throwSpeed.z + arrow.transform.position.x; ballClone.rigidbody.AddForce(throwSpeed, ForceMode.Impulse); audio.Play(); //play shoot sound } |
32. Remove Ball
In the following code block, we test if the ball reaches the floor and remove when it does. We also prepare for the next throw by resetting the variables.
1
2
3
4
5
6
7
| /* Remove Ball when it hits the floor */ if (ballClone != null && ballClone.transform.position.y < -16) { Destroy(ballClone); thrown = false; throwSpeed = new Vector3(0, 26, 40);//Reset perfect shot variable |
33. Check Available Shots
After removing the ball, we verify that the player has shots left. If this isn't the case, then we end the game and callrestart.
01
02
03
04
05
06
07
08
09
10
| /* Check if out of shots */ if (availableShots == 0) { arrow.renderer.enabled = false; Instantiate(gameOver, new Vector3(0.31f, 0.2f, 0), transform.rotation); Invoke("restart", 2); } } } |
34. restart
The restart method runs two seconds after the player runs out of shots, restarting the game by invoking LoadLevel.
1
2
3
4
5
| void restart() { Application.LoadLevel(Application.loadedLevel); }} |
35. Testing
It's time to test the game. Press Command-P to play the game in Unity. If everything works as expected, then you're ready for the final steps.36. Player Settings
When you're happy with your game, it's time to select Build Settings from the File menu and click the Player Settings button. This should bring up the Player Settings in the Inspector panel where you can set the parameters for your application.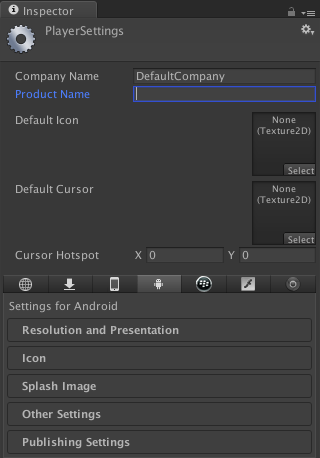
37. Icons and Splash Images
Using the artwork you created earlier, you can now create a nice icon and a splash image for your game. Unity shows you the required sizes, which depend on the platform you're building for.38. Build and Play
Once your project is properly configured, it's time to revisit the Build Settings and click the Build Button. That's all it takes to build your game for testing and/or distribution.
Conclusion
In this tutorial, we've learned about 3D models, mesh colliders, physics materials, collision detection, and other aspects of Unity game development. I encourage you to experiment with the result and customize the game to make it your own. I hope you liked this tutorial and found it helpful.By:
No comments:
Post a Comment